OTC-011 Off The Cuff ~Sewing Style~: January 2012 <body><script type="text/javascript"> function setAttributeOnload(object, attribute, val) { if(window.addEventListener) { window.addEventListener('load', function(){ object[attribute] = val; }, false); } else { window.attachEvent('onload', function(){ object[attribute] = val; }); } } </script> <div id="navbar-iframe-container"></div> <script type="text/javascript" src="https://apis.google.com/js/platform.js"></script> <script type="text/javascript"> gapi.load("gapi.iframes:gapi.iframes.style.bubble", function() { if (gapi.iframes && gapi.iframes.getContext) { gapi.iframes.getContext().openChild({ url: 'https://www.blogger.com/navbar.g?targetBlogID\x3d10604511\x26blogName\x3dOff+The+Cuff+++++++++~Sewing+Style~\x26publishMode\x3dPUBLISH_MODE_BLOGSPOT\x26navbarType\x3dTAN\x26layoutType\x3dCLASSIC\x26searchRoot\x3dhttps://off-the-cuff-style.blogspot.com/search\x26blogLocale\x3den\x26v\x3d2\x26homepageUrl\x3dhttp://off-the-cuff-style.blogspot.com/\x26vt\x3d-8803809636534965068', where: document.getElementById("navbar-iframe-container"), id: "navbar-iframe" }); } }); </script>

1/31/2012

A Musician's Shirt...

A musician I have known for years and who is also a long standing client of mine, recently ordered another of my shirts.  His request?  "I want a lightweight denim shirt that doesn't look too casual, and give it some jazzy style". My response, "Can you give me some idea of what you have in mind?" To which he replied, "Design something, Pammy, Design something !"


 I had some slightly distressed lightweight denim and some striped chambray in my "shirt-making stash". The fabric was stacked together on the shelf, and I liked the combination...now I had to decide how to combine them.  I knew right away that I wanted to make a contrasting right center-front placket with the striped chambray cut on the bias. But was that going to be enough "jazzy style" for my client? Hmm...so I cut the inner yoke and inner collar stand from the chambray, and added a strip of it to the pocket.   (Side thought--You may notice that the pocket, collar, and cuffs are a bit "oversized". My client is a big man, and smaller design details tend to look childish on his shirts.)


Was it "jazzy" enough yet?  Before sewing further, I sent a photo to my client. His reply was, "Do more with that stripe, I like it."  So throwing caution to the wind, I added a wide bias-cut sleeve placket, and "wrapped" the edge of the cuffs with the chambray. 

After the buttons were sewn and threads snipped, I boxed up the "jazzy shirt", and delivered it to my client, leaving it with his wife...hoping he would like it. Then I went to the bank and cashed his check.  I heard from him later that day...he is very happy with the design...always a thrill for me.  And a good thing...because I had already spent the money :)

SEWING NOTES: The shirt is finished with the wooden buttons that we carry at www.FashionSewingSupply.com .  I turned them over and used the back side of the buttons as the front.  The denim "parts" of the shirt that needed to be reinforced were interfaced with our 60" wide Pro-Weft Supreme Lightweight  The chambray was interfaced with 62" wide Pro-Sheer Elegance to stabilize the bias cut pieces, inner collar stand, and the inner cuff. 


Here is the quick sequence of how I wrapped the edges of the cuffs--

-- Cut the outer cuff the size of the pattern piece. Using contrasting fabric, Cut the inner cuff about an inch wider and about an inch longer than the outer cuff (interface wrong sides of both inner and outer cuff). Right sides of cuff pieces are shown below.


 --Center the smaller outer cuff on top of the larger inner cuff, Right Sides Together, align (match) one side of the long edges, and stitch a 1/4" seam along that one long edge, as shown below.


--Open the cuff, and Press the Seam Allowances toward the contrasting inner cuff. This is how it will look from the right side....


And this is how the pressed seam allowances will look from the wrong side...
(remember--the wrong sides have been interfaced)


 --Then WRAP (fold) the inner cuff OVER (around) the seam allowances, enclosing them.  The seam allowances are still pressed toward the inner (contrast) fabric...they are now "wrapped" (enclosed)  by the inner (contrast) cuff...


--Now, trim the excess contrast fabric so that the RAW edges are even...

--DONE!  This is the finished wrapped cuff, (the outer "public" side) ready to be sewn to the shirt sleeve...


and this is how the wrapped cuff looks from the inner (back) side (the side that will touch the wrist when the cuff is sewn to the shirt)...


What do you think? Please add a comment by clicking here--> 29 comments

1/23/2012

Make your own Fusible Stay-Tape...without cutting strips!


Make your own Fusible Stay Tape...without tedious cutting or trimming!


You can make any width of fusible stay tape that you may need if you have 


It's So Easy....because ProWeft Supreme Lightweight will tear perfectly straight along the cross-grain, every single time!  All you need to do to make your own fusible stay tape is to make a little snip at the selvedge edge, then tear the ProWeft Supreme Light across the width of the yardage. Because ProWeft Supreme Light is so wide, each strip will be 60" long.

The tape I made shown in the photo above was "snipped-then-torn" about 3/8-inch wide. You can tear your strips at any width from 1/4" to 1/2" to use for reinforcing the front edges of jackets (or for wherever you need to use a soft "fusible stay tape"), up to 2-3 inches or more to reinforce jacket hem and sleeve vents, and other tailoring/dressmaking uses.

This "Stay-tape" will fuse easily along any straight fabric edge, and because ProWeft Supreme Lighweight is so flexible, you can follow any curve or angle easily (as you can see in the photo above).


What makes this Interfacing so special?


Pro-Weft Supreme Lightweight Fusible  has become known as "The interfacing for All Seasons" because it is a knit and woven interfacing combined into one fabulous product that  "breathes" because of its unique weave and its specially formulated highly flexible fusible resin. 

Custom-milled exclusively for Fashion Sewing Supply, it is available in both Natural or  Charcoal Black.  It's terrific for tailoring (especially as a complete underlining for jackets and coats), stablizing hems, wonderful for waistbands, and super for casual shirts made from medium to heavy weight fabrics like denim, chambray, hemp, and flannel.  Pro-Weft Supreme Light is perfect for so many types of fabrics and weaves like Linen, Boucle, Silk, Gabardine, Wools, Denim, Twill, and more!
 

How is it different than other kinds of Interfacing?

A woven interfacing like ProWoven Standard has the lengthwise fiber threads (warp) and crosswise fiber threads (weft) woven together.   PRO-WEFT Supreme Lightweight is a special kind of "weft insertion" interfacing where the fiber threads are first knit, and then crosswise (weft) fiber threads are woven (inserted) into the knit yardage.

Woven interfacing like ProWoven Standard  is totally stable. Knit interfacing like  
Pro-Tricot Deluxe is soft and has stretch. By combining the properties of both knits and wovens, PRO-WEFT Supreme Lightweight is both totally stable and wonderfully flexible.


Please visit ~FASHION SEWING SUPPLY~ for more information.

Labels: ,

What do you think? Please add a comment by clicking here--> 7 comments

1/20/2012

DIY Sewing Machine Repair !


I found out about the Autonopedia site from a fellow member of  the Creative Machine (a Yahoo Group).  The site is jam-packed with information about cleaning, oiling, and repairing our sewing machines.  It sure seems to be a fantastic source of useful information...so I am passing it along, just FYI :)

Labels:

What do you think? Please add a comment by clicking here--> 7 comments

1/19/2012

TUTORIAL- Refine the Lines...Making a Shirt look "Custom" - REVISED

In this tutorial I am going to demonstrate how to refine the shape of a typical "straight-line" Yoke and Back of a commercial Shirt pattern. 


The differences between shirts made from most commercial sewing patterns and my custom-made shirts are often quite subtle, but deliver a big impact on how the shirts look when worn.  The shirts I draft by hand have yokes that lay smoothly along the upper back and shoulders with no bunching or ripples. The seam that joins the yoke to the back is contoured...allowing the fabric below to flow over the body gently, rather than just fall from it.

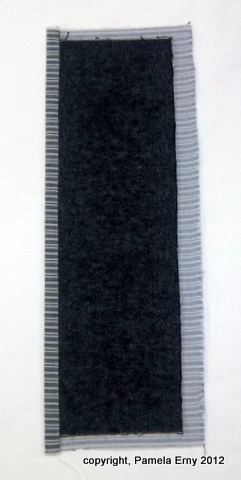
 ^Click any of the photos to enlarge^

Two of the many subtleties that I incorporate into my shirt designs are curved (shaped) yokes and backs. The pattern pieces shown above are examples of a  "pattern-in-progress" that I am hand-drafting for one of my clients. It is based on a draping session done to achieve a truly custom fit and will be fine-tuned  before the final pattern is drafted and the fabric cut. 


Of course, I cannot possibly teach you my custom shirt pattern "Drafting by Hand from Measurements" methods in a blog post.

But I can demonstrate how to refine the lines of a commercial pattern that has been drafted with a "straight-line" Yoke and a "straight-line" Back. The commercial pattern used to make these changes should be one that has regular ease, rather than a "fitted" style.

Let me add here that if you have a shirt pattern with a straight Yoke and Back that you like, that's fine. I am not saying that one draft is "better" than the other. This is just an example of how to do another draft...one that I just happen to prefer  :)

The first step in this process is to make a copy of the pattern that you want to change ( NOTE--it is best to make these changes to a pattern you have already sewn "out of the envelope" in the correct size and with which you are fairly satisfied, because I will not be addressing fitting issues.)  

You will need a copy of Yoke, the Back (without the Center-back pleat...fold it out of the way before making the copy), and the Sleeve...ALL OF THEM WITHOUT THEIR SEAM ALLOWANCES.  Please note that with the exception of the sleeve, working with 1/2-width pieces is easier when making these changes, and will take less time and paper than making full-width copies of the pattern pieces.

The brown paper pattern pieces that you see in this demonstration purposely do NOT have notch markings...because I want you to see how the SHAPES change without extraneous marks.

Let's begin with refining the YOKE.

As shown below, Mark a point that is approximately at the mid-point along the bottom of the yoke pattern piece. Make a second mark at the side that is a very scant 1/4-inch up above the corner. Then using a ruler with a gentle curve, draw a line connecting the marks.  If my written directions are not clear, the photo below should be.  Please remember this is not rocket science, I have just drawn a gently curved line on the Yoke piece. The key to this entire process is to make small  gentle changes to the existing pattern. The goal is to "refine" the pattern in a subtle way, not to make big design changes...we'll do that another time.

Next, cut along the curved line that was drawn, trimming off the excess, to finish making the new Curved Yoke--


Now we will refine the BACK Pattern Piece of the shirt to match its newly curved Yoke--

Lay the New Curved Yoke piece onto the the Shirt Back as shown below....the yoke will be "pointing" down, and center backs are matched.  You can see how the straight part of the Shirt-Back extends beyond the new curved Yoke. Now, transfer the curved shape of the Yoke onto the straight part of the back by tracing along the edge of the yoke with a pencil as shown.


After you trace the shape of the Curved Yoke onto the Shirt-back, it will look something like this--


Next, just as we did with the Yoke...trim off the excess (by cutting along the curved line that was drawn) to finish making the new Curved Back.


And there we have it!  Two pattern pieces that once were straight are now curved--


BUT WAIT!   There has been a total of a scant 1/2" removed from the pattern pieces at the armscye edge...making the Back armscye a little smaller. You may be thinking, "OMGosh! What about the SLEEVE ?"   Luckily it is as easy an adjustment as the others.


Here is how to change the SLEEVE pattern to fit the new Back-armscye--

Take the copy of the sleeve pattern that you prepared (I am showing you a shortened version for this demonstration), and mark the shoulder dot by comparing it to the original pattern.  Then draw a straight  line from the shoulder dot to the bottom (hem or cuff-edge), as shown below.


Then cut along the line, starting at the top (shoulder point) and ending about 3" from the bottom. You are not cutting it totally apart, just about 3/4 of the way down--


To finish, lap the Sleeve BACK over the Sleeve front...by a scant 1/2" as shown below,  and tape to hold.  (note- I have folded the Top edge of the Back ONLY so you can see how it was overlapped).

 Because we ONLY changed the BACK armsyce of the shirt Body, we ONLY need to change the BACK of the Sleeve. The front of the sleeve stays the same, and the shoulder point has NOT been moved.
Remember what I said about Small Gentle Changes?  If the Yoke and Back are changed by more than a scant 1/4" each, a total re-drafting avalanche will break loose! 

ALTERNATE METHOD--- IF YOU ARE RELUCTANT TO CHANGE THE SLEEVE TO MATCH the SLIGHTLY SMALLER (SHORTER)  BACK ARMSCYE--
Restore the length of the Back armscye by extending it out at the side seam by a scant 1/2" -- NO SLEEVE CHANGE NEEDED. 


So we have new refined patterns, now what? 

1. Add the seam allowances and notches to your pattern pieces-- Trace them again, adding the seam allowances. Then use the original pattern piece and transfer any notches/pattern markings including "place on fold" mark, and grain lines.
About the notches on the Sleeve--the only one I care about is the shoulder point, and I also make marks indicating the front and back of the sleeve. Why don't I care about the sleeve "ease dots"? Because I do not use them. I match the Shoulder point of the Yoke to the Shoulder Point of the sleeve, then distribute whatever ease there is as I stitch and approach the rounded sleeve cap.

2. Remember, the Center Back pleat was removed from the Back when the pattern copies were made. You may choose to leave it off, or add it back on by measuring the width of the pleat on the original pattern and remembering to add it when you are tracing the final pattern with seam allowances.

3. I know some of you are wondering about the FRONT, aren't you?  We have done nothing to the front at all...so we USUALLY do not have to make any changes to it. 
OK..I hear the gasps of shock and horror from the "by-the-book" pattern drafters out there.  Relax...remember, we just made very small very gentle changes.  There is a possibility  (depending on how the front armsyce of your commercial pattern has been drafted),  that the length of side seams of the shirt might not match exactly.  So, before you set the sleeve, fold the shirt at the shoulder point on the yoke, match the unsewn side seams from the hem edge up to the armscye and trim IF there is any excess.

You may be wondering, "Good Heavens, does Pam do this to every shirt pattern she uses?"  Umm..NO.  I do prefer curved yokes and curved backs, so I draft my original shirt designs by hand, and include those features as I render the draft.  When I use commercial patterns, I usually choose vintage patterns because many of them already have shaped yokes and backs. And yes there are times when I use a vintage or other pattern that has a "straight-line" yoke and back...when I want a more casual shirt silhouette.

 Over the years I have written countless sewing tutorials and also many about Drafting Shirt Patterns, including ways to improve the patterns that you already have.  Here are the links to my Drafting Tips and Tutorials below, for your convenience--
(THE COLOR OF THE LINKS below may be light, BUT THEY DO WORK...the Blogger editor is often uncooperative...sigh)


Labels:

What do you think? Please add a comment by clicking here--> 42 comments

1/14/2012

Hair Balls in the Sewing Studio !

Roger cleaned the castors on my "studio sewing chair" and this was the disgusting abundant  result....

Cough, Cough, Cough, Blech!
All that thread slowing down my chair really did feel like tangled hair balls!
...not that I have ever personally experienced a hair ball (and you'll just have to take my word on this). 

Ooooooh my chair "feels" so much better!  Now I can easily roll on over and continue to write and photograph the "Shirt Pattern-Drafting Finesse" TUTORIAL that I have been preparing for you :)  Here's a hint--


What do you think? Please add a comment by clicking here--> 16 comments

1/11/2012

My New Bundle of PRESSING Joy!


OH BOY!  I have a brand new really Large and Wonderful 
Tailor's Pressing Ham! 

Isn't she beautiful?


As you can see...this new Ham of mine is so much larger than the ones found at fabric and notions stores.
It is professionally hand-made by Sonia at The Stitch Nerd Shop  ...and very reasonably priced for it's size.  

Oh yes, you need one of these...you really do.

If you have never had a large pressing ham like this one...well...you don't know what you've been missing. The long length of curve gives you so much better control of pressing darts and princess seams...it makes a big difference.

I used to have one just like it during my tailoring apprenticeship, but my EX-husband threw it into the fireplace along with some of my other sewing tools when I announced I was leaving...but that's another story.  I did try to make one myself from sawdust begged from a lumber mill...but the thing exploded all over my sewing machine and studio when I tried to stuff and stitch it. I have been using a make-shift version of a large ham...but it's not at all the same as this new one.  And really, I suppose I could have tried the whole saw-dust thing again...but to me It just wasn't worth trying again when these are so well-made and reasonably priced.

I have absolutely NO affiliation with this store. I am just extremely impressed with the quality of this product. 
So impressed that I just ordered this Ham and Seam-roll Holder...the one I am using now needs to go to the same place that I just tossed my former very ancient (smaller) Ham...into the trash!
                                                                           

Labels:

What do you think? Please add a comment by clicking here--> 22 comments

1/05/2012

She claims to be a Tailor?

 ...and Yes, really and truly I am :)   While it's true that the focus of my apprenticeship was Shirt-Making, I was instructed quite intensively in both Classic and "Simple" tailoring.

Although my lifestyle now is quite casual, there are times that I take a break from Shirt-making for my clients to draft, tailor, and sew jackets and coats for myself.

Here is an example of  the kind of "casual" tailoring I do for myself these days. I made this coat a few weeks ago, from lovely cashmere coating that a Tailor friend sent to me. I drafted the pattern myself...a simple wrap style with side panels, and slightly dropped sleeves.  Please pardon the quality of the photo. I just snatched the coat straight out of out of the closet, put it on my form, and snapped the pic. A little steaming to smooth the nap near the hem would have a good idea, but...oh well, next time :)

The fabric was completely underlined with Pro-Weft Supreme Medium (exclusive to Fashion Sewing Supply), with 2 layers of it used in the turn-back collar/revers areas, all facings, and the back vent.  It gives the perfect amount of support without affecting the luscious fluidity of the cashmere.  Of course, the coat is fully lined.

Next up in my tailoring plans is a notched-collar blazer jacket, made with this lovely wool tweed and a pattern I drafted myself. 

 Or maybe I'll make it from another wool fabric I have made "ready for the needle" by using my *Dryer Pre-treament Method*. Here's the link in case you missed the tutorial when I first posted it way back in 2009 ;)

I often change my mind about the fabric  right before the scissors snip the cloth. But at least I am committed to the pattern!
The muslin has been stitched and fitted and I am very happy with the draft.  

Hopefully I will be able to sneak away from all the action going on at my online store, Fashion Sewing Supply, and at least get the jacket cut-out and interfaced!  And I'll try to remember to snap some photos along the way, so you can see my progress.

Labels: ,

What do you think? Please add a comment by clicking here--> 25 comments


Site Meter