OTC-011 Off The Cuff ~Sewing Style~: March 2009 <body><script type="text/javascript"> function setAttributeOnload(object, attribute, val) { if(window.addEventListener) { window.addEventListener('load', function(){ object[attribute] = val; }, false); } else { window.attachEvent('onload', function(){ object[attribute] = val; }); } } </script> <div id="navbar-iframe-container"></div> <script type="text/javascript" src="https://apis.google.com/js/platform.js"></script> <script type="text/javascript"> gapi.load("gapi.iframes:gapi.iframes.style.bubble", function() { if (gapi.iframes && gapi.iframes.getContext) { gapi.iframes.getContext().openChild({ url: 'https://www.blogger.com/navbar.g?targetBlogID\x3d10604511\x26blogName\x3dOff+The+Cuff+++++++++~Sewing+Style~\x26publishMode\x3dPUBLISH_MODE_BLOGSPOT\x26navbarType\x3dTAN\x26layoutType\x3dCLASSIC\x26searchRoot\x3dhttps://off-the-cuff-style.blogspot.com/search\x26blogLocale\x3den\x26v\x3d2\x26homepageUrl\x3dhttp://off-the-cuff-style.blogspot.com/\x26vt\x3d-8803809636534965068', where: document.getElementById("navbar-iframe-container"), id: "navbar-iframe" }); } }); </script>

3/29/2009

Shirt Pattern Alteration for Full Hips and Prominent Abdomen


Here are 2 simple pattern alterations that can be made to add extra room for a Prominent Abdomen (tummy) and/or Hips

After slashing and spreading the pattern the necessary amount, "true" the lines of the pattern....as shown by the black lines.
These changes add ease just where it is needed, without having to move up to the next larger full pattern size.

Labels: , ,

What do you think? Please add a comment by clicking here--> 11 comments

3/23/2009

No Pointed Collar and Rough Around the Edges

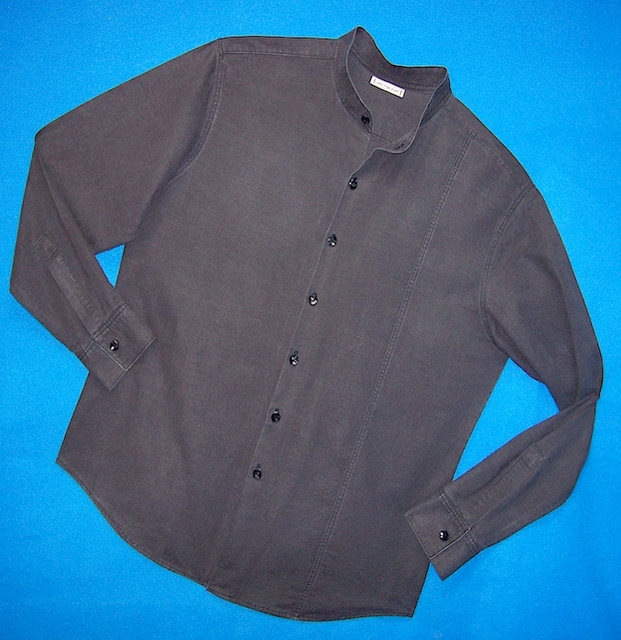
This original shirt design was made for one of my favorite clients...who lets me freely experiment with fabric and design. His only requests? "No pointed collar, black fabric, and make it look sort of rough."

Here's the result...
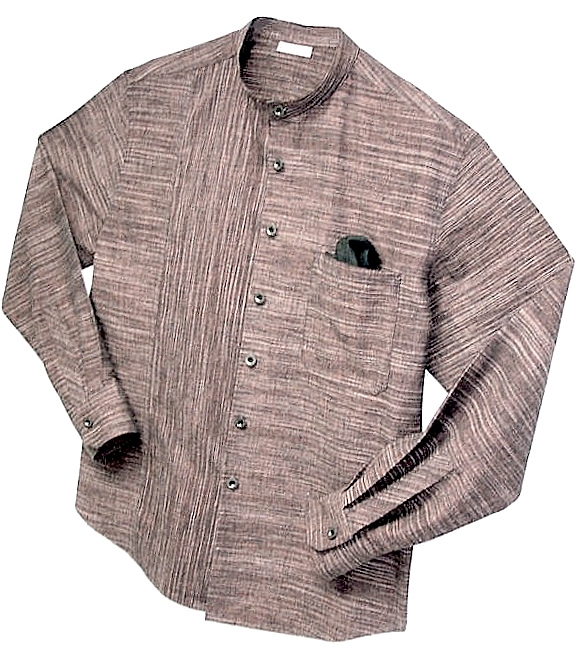
A supremely comfortable band collar shirt with a "Prince Seam"
made from a Medium-weight silk/hemp blend fabric.


Black "distressed" Silk-Hemp Mens Shirt

Making it "rough" was fun! Usually I distress fabric before I cut and sew. This time I pre-washed the fabric very gently...just to get some of the "shrink" out of it. Then I took it out of the dryer and merely smoothed out the fabric...leaving some fine wrinkles....and cut and sewed the shirt. After it was complete, I tossed it into the washer along with several (clean) tennis balls, and ran it through 10 (yes ten!) cycles. Don't worry. I didn't waste water, I just kept re-setting the cycle. After a long tumble in the dryer (set on hot), the shirt was gloriously soft, the flat-fell seams nicely puckered and "worn looking", and the fabric slightly faded.


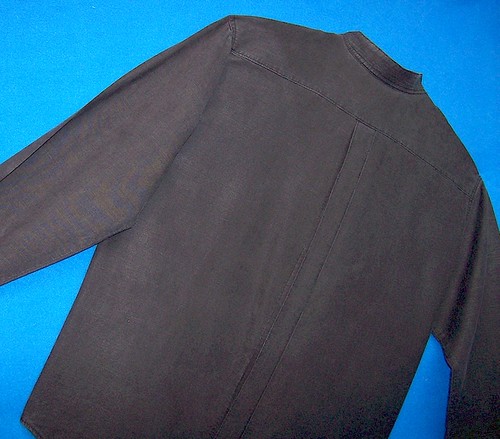
Here is the back view....showing the edge-stitched box pleat.


Black Silk-Hemp Mens Shirt--Back Topstitched Pleat


The best part? My client is thrilled with his new shirt...and that's what it's all about!


Sewing Notes: Hand-drafted Original Design, Buttons and Pro-Woven Shirt-crisp Fusible Interfacing from ~Fashion Sewing Supply~, Fabric from Hemp Traders.

Labels: , , ,

What do you think? Please add a comment by clicking here--> 22 comments

3/09/2009

"It's Crowded in Here" ...How to Draft a Better Collar Pattern

Recently I've been asked by several people through email for shirtmaking tips. So here is a short tutorial that I originally wrote way back in 2005, that some may have missed--


~~~~~

It's no wonder some collars have their allowances "all in a bunch" ...there isn't enough room in the point!


One way to help collar seam allowances have the room they need to stay nice and flat with no lumps is to "open" the point of the collar pattern.


Notice the diagram of the collar pattern shown to the left. The black outline is the original pattern. The blue line shows how to alter the angle of the point.


The method is easy:


  • Trace a copy of the pattern, *without* seam allowances.
  • Locate the neck-edge Center Front. This will be your "pivot point", as shown.
  • Make a mark, 1/8" to 1/4" -IN- from the collar's -TOP- edge point.
  • Draw a line from the neck-edge -CF point- up to the mark made at the collar pattern's TOP edge...shown as the blue line in the diagram.
  • Cut along this newly drawn line to complete the pattern alteration. Don't forget to add seam allowances!


The length and shape of the neck-edge of the pattern has not changed, all the "parts" will stitch together as usual. This simple method will work with any collar, including shirt collars that are attached to a stand. Changing the angle of the point by such a small increment will not affect the collar's "fall". Remember, all that's been done is a very slight change to the angle of the collar point, giving its seam allowances more room to settle flat and smooth when the collar is stitched and turned.


The blue shirt collar shown to the left is an example of how sharp and smooth a collar can be when the angle of the point is opened a bit. Of course, there are other techniques that help a shirt/blouse collar look sharp and professional, but changing the pattern is a good place to start!
SEWING NOTES- Sewn collar shown above is interfaced with Pro-Woven Shirt-Crisp Fusible Interfacing from ~Fashion Sewing Supply~

Labels: ,

What do you think? Please add a comment by clicking here--> 6 comments

3/06/2009

Stripes and Flowers for the Little Diva

My youngest niece, Bella, turns 8 years old soon...too soon...I wish they could stay little forever! So...while she still enjoys bright cheerful clothes,
I made this set as part of her "Birthday Wardrobe."


Bella's Birthday Hoodie

This outfit was made with Ottobre Design patterns that I changed liberally to suit my design whim of the moment.

The Hoodie is from issue 04/07, #16, made with Chez Ami fabrics.

The Pants are the elastic waist pants pattern, issue 03/03, #23, made from cotton twill.


SEWING NOTES-- Pro-Tricot Interfacing and Pro-Stretch Elastic from ~FASHION SEWING SUPPLY~

Labels:

What do you think? Please add a comment by clicking here--> 11 comments

3/04/2009

Taking a bow and saying Thanks


Lori from Girls In The Garden has graced me with this this award.

Thank-you Lori....you are a constant source of design inspiration and one of the most talented sewists I know!


The guidelines of this award are:
1. Put the logo on your blog or post
2. Nominate at least 10 blogs which show great Attitude and/or Gratitude!
3. Be sure to link to your nominees within your post.
4. Let them know that they have received this award by commenting on their blog.
5. Share the love and link to the person from whom you received your award.

I enjoy SO many blogs...here are just SOME of my favorites, whom I will link to in this post:


Yes..I know that's just 7...but what can I say? I'm a rule-breaker, LOL!

What do you think? Please add a comment by clicking here--> 5 comments

3/02/2009

Fun Designs for the Birthday Girl !

Oh how fast they grow up.....sigh......

Willow's CrossOver Top and brown Pants

It seems like just yesterday that I was designing little toddler dresses for my niece Willow. In a few days she will be 10 years old...it doesn't seem possible...

This set is but one of many outfits I designed and sewed for her "Birthday Wardrobe".
Ten year old girls can be fickle...I hope she likes it!

The top started with an Ottobre Design pattern (from issue 01/05, style #25), that I modified adding double-sleeves, a double hem, and a wide binding strip to the neckline.

The pants started with another Ottobre Design pattern (from issue 03/03, style #23), that I modified by slimming the leg, adding a false-fly, and slightly changing the shape of the pockets.

Labels:

What do you think? Please add a comment by clicking here--> 10 comments

3/01/2009

A Favorite...Textured Silk/Hemp Prince Seam Shirt

This shirt style is a perennial favorite among many of my clients.

OTC_HempPriceShirt

Made from a richly textured blend of silk and hemp, this original design features a "Prince Seam", a narrow band collar, pewter buttons, and angle edge cuffs and pocket.

SEWING NOTES: Fabric from Hemp Traders, Interfaced with PRO-WEFT Fusible Interfacing from ~Fashion Sewing Supply~

Labels: , ,

What do you think? Please add a comment by clicking here--> 9 comments


Site Meter